The excuse of the high pressure seamless gas cylinders of the status of the nondestructive testing, pointed out that nondestructive testing is an effective method of cylinder manufacturing and inspection in service.
Subject headings High pressure seamless gas cylinder Nondestructive testing standard ultrasonic acoustic emission surface thickness detection
Dosage of high-pressure seamless gas cylinders is a big, strong liquidity, under cyclic load pressure container, it is mainly used for industrial gas storage and transportation. According to incomplete statistics, put into use in the world about one hundred and fifty million cylinders, capacity is generally 10 to 15 l, 140-230 - mm in diameter, wall thickness of 3.0-14 mm. High-pressure seamless gas cylinder quality usually unified management by the state, have now been extended to the interstate and international development trend, a national security supervision system in our country. Due to high pressure seamless gas cylinders have many unique properties, so its design, material selection, fabrication, inspection and regular inspection standards and specifications are sui generis. Founded in the '60 s safety supervision institutions and cylinders was founded in 1983 the national standardization technical committee have done a lot of work, formulated the cylinders standardization system, has completed 77 national standard and professional standard of 32. With the constant improvement of gas cylinder safety supervision and standardization, and the progress of science and technology of the industry, our cylinder has played an important role in various application fields.
Domestic high-pressure seamless gas cylinders are main standards and specifications: GB5099 steel seamless gas cylinders, GB11640 aluminum alloy seamless gas cylinders and GB13004 steel seamless gas cylinder regular inspection and evaluation of Ann, GB13077 aluminum alloy seamless gas cylinder regular inspection and evaluation and gas cylinder safety supervision regulations, etc. Traditionally thought that in the past, seamless gas cylinders eventually quality (including material, design, manufacture and use, etc.) are available to ensure that the water pressure test. Therefore, in the current standard specification, there is no effect on nondestructive testing of clear rules and any mandatory requirements are put forward. But starting in 1968, in Switzerland and some industrial developed countries high pressure seamless cylinders, a series of catastrophic accident losses. Cylinders on analysis was found, although after a statutory water pressure test, but under the condition of no significant external influence still explodes, effectively illustrate the current manufacture and use of standard system is not perfect in service. Hydrostatic test is surely important, but is not everything, there is no guarantee that the critical defect detection and prevent the expansion of the defect. At the same time of high purity gases or strong corrosive medium have seamless gas cylinders, cylinder cleaning after water pressure test, displacement and drying is also a headache, therefore, high pressure seamless gas cylinders of nondestructive testing technology research and formulate and perfect is obviously when testing standards
Services.
1 high pressure seamless gas cylinders of nondestructive testing
High-pressure seamless gas cylinder with no weld, there is no obvious weaknesses, wall defect is difficult to detect, therefore, compared with the pressure vessel, with great difficulties in nondestructive testing.
Comprehensive achievements of research and development at home and abroad, the current high pressure seamless gas cylinders of nondestructive testing mainly includes the thickness, surface testing, ultrasonic testing and acoustic emission testing.
1.1 thickness
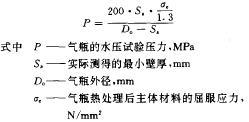
Thickness measurement technology is one of the older method, although simple, but practical and reliable. Caused by various reasons in the process of manufacturing large wall thickness deviation or serious corrosion led to a wall thickness obviously thinning and standard specification of the requirements of the cylinders should be the determination of the thickness, the minimum wall thickness will be measured by the value under the plug type for strength checking cylinder.

If P can't satisfy the requirements, the cylinders should be scrapped or step-down use,
Thickness method should press JB74 XXX pressure vessel NDT (for approval).
1.2 surface detection
Magnetic powder and penetration of surface is the traditional NDT methods, used to detect surface defects generated in manufacture and use in service. Magnetic particle testing are mainly used for detecting steel seamless gas cylinder surface and near surface defects; And penetration testing is mainly used for detection of aluminum or other material made of seamless cylinder surface defects. Due to the seamless gas cylinder wall cannot be touched with the hand, as a result, steel seamless gas cylinder wall defect, according to the following steps to test.
1.2.1 to replacement of cylinder, and compressed gas cleaning walls.
1.2.2, spray on the inner wall of the cylinder, quick dry white background color.
1.2.3 to overall magnetization of a cylinder, the mixer good magnetic suspension of bottle mouth evenly sprayed to the lining, and optical fiber endoscope observation and assessment of defects.
Magnetic powder and penetration testing methods should be conducted with reference to the relevant regulations of the pressure vessel NDT.
1.3 ultrasonic testing
Ultrasonic testing is a kind of mature testing technology. At present, the domestic gas cylinders manufactured and used in service standard system, there is no corresponding ultrasonic testing standards. And in the world, especially in Europe, there have been some industrialized countries to ultrasonic testing on the related standard of gas cylinder for enforcement. According to the actual use roughly the following.
1.3.1 hydrogen bottle manufacturing and regular inspection of ultrasonic testing
In the early 70 s, in industrialized countries, serious damage and failure of the hydrogen gas bottle, traditional fabrication and regular inspection standards cannot effectively guarantee security. Experimental study found that the failure of hydrogen gas bottle is associated with the existence of defects. In the cycle of the gas tank to put under the action of stress, to a certain limit the size of the defect, extension will happen, but usually at a slow pace. When there are hydrogen, the defective parts will produce local embrittlement effect. Cylinders, so as to accelerate the propagation of the crack cause of the damage and failure. This kind of defects available ultrasonic detection. According to the above situation can be draw the following conclusions.
1.3.1.1 hydrogen the defects inside the bottle can and should be checked out in ultrasonic testing, the detection sensitivity shall ensure that no dangerous defects are missed.
1.3.1.2 hydrogen cylinders should carry on the calculation and destructive testing, to determine its life, usually charge number shall not be more than 7500 times.
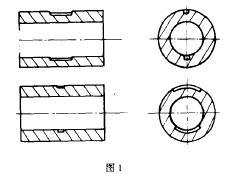
Industrial gas committee (IGC) in Paris to ultrasonic testing as hydrogen cylinders check restrictive content included in the standard specification. The detection sensitivity with 5% rectangular groove depth of wall thickness of artificial samples to correction. Sample of material and size should be the same as the checked the cylinder, its shape is shown in figure 1. Since 1976, Germany and parts of Europe to bottle and less use of on-board hydrogen cylinders are made of the above specification and inspection in service and satisfied results have been achieved, thus basically solved the hydrogen gas bottle safety problems.
1.3.2 the application of ultrasonic testing in carbon monoxide gas cylinders
End of the 60 s, some countries have found in the process of carbon monoxide in hydrostatic test or cylinder filling failure and explosion happens. By the analysis of failure is by the residual water in the bottle and carbon monoxide and hydrogen induced stress corrosion crack. Western Europe keep long-term experimental study on the following conclusions.

1.3.2.1 increased nondestructive testing requirements, especially the ultrasonic testing requirements. Ultrasonic detection sensitivity can be stipulated in the IGC artificial sample to correction, but should be 8 db higher than that of hydrogen gas bottle detection sensitivity. The sensitivity of the destruction mechanism of a large number of experiments prove that this level is appropriate. Hydrogen induced stress corrosion crack area can be detected.
1.3.2.2 should adopt special methods to ensure the cylinder inside dry.
1.3.2.3 carbon monoxide gas cylinders shall not adopt any of hydrogen induced stress corrosion crack sensitive materials.
At present, the detection method in Germany and Europe received a large number of applications, has become an integral part of the cylinder standard specifications.
1.3.3 ultrasonic testing instead of hydraulic pressure test
ChengYouJiang corrosion or high purity medium high-pressure seamless gas cylinder, inner surface should be dry and clean up after water pressure test, or medium explode with water in the bottle. Due to clear the difficulty, therefore, many gas cylinders after water pressure test cannot be used for holding this kind of medium, and using ultrasonic testing instead of hydrostatic test is effective.
In order to more effectively in ultrasonic testing, should be based on the previous work, finite element calculation, make different shape bottle stress conditions, find the weak link, easy to determine the detection sensitivity.
Since 1990, use this alternative to testing and manufacturing test under certain conditions in service are promotion, has been recognized by some countries government at present. This trend will lead to laws of compressed gas technology (TRG) modification and supplement, so as to further perfect the current standard specification.
1.3.4 ultrasonic testing instead of cylinder wall visual inspection
In discussing the various applications of ultrasonic testing in the cylinder, it is very remarkable, which USES ultrasonic detection instead of in service of internal visual inspection. Doing this can save time and cost, and residual gas without replacement and cleaning. Is limited but the alternative, a large number of test data show that only when meet the following conditions, on the basis of the scheme is feasible.
1.3.4.1 test aims to find those cylinders may lead to damage or failure of the defects.
1.3.4.2 cylinder wall shall not have any production and use of injury, as well as the local corrosion.
1.3.4.3 filling medium should guarantee the dry and purity, control the content of harmful medium.
1.3.4.4 manufacture date application unification limits, may not be too long.
1.3.4.5 cylinders have been meeting the qualifications mentioned above shall be on logo, in order to avoid confusion.
So far, using ultrasonic testing instead of in service inspection of internal visual inspection is still confined to a small range, but there is growing trend. As for can achieve much scope, still need to do a lot of work.
1.3.5 ultrasonic testing system
Due to high pressure seamless gas cylinder quantity bedding face is wide, therefore, scanning far cannot satisfy the requirements by hand. In order to solve this problem, the following will introduction abroad currently USES a set of cylinders the main performance of ultrasonic detection system (Switzerland).
1.3.5.1 by tilting the rotation of the platform will be check cylinders placed in the right place.
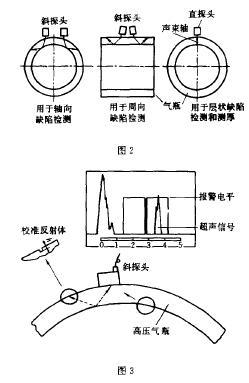
1.3.5.2 can make clamping frame along the cylinder surface with five probe to scan (figure 2). Four scan probe used in axial and circumferential defects (5 MHZ, a = 42 ° to 45 °), a probe for layered defect detection and thickness (5 MHZ, a = 0 °).
1.3.5.3 acoustic wave through a short water path into a cylinder and the flaws of the bottles (corrosion, crack, strain, etc.) will have a visual on the electronic screen evaluation system, or sound alarm signal. According to the character of the defect location and reflection, to evaluate the harmfulness of defects (figure 3).

1.3.5.4 detection sensitivity adjustment on artificial sample, it is made with cylinders were the same size, same materials a Tong festival processing made of four rectangular groove, its shape as shown in figure 1, the depth of the rectangular groove for the wall thickness of 5%.
Ultrasonic testing method can be reference in the pressure vessel NDT cylinder forgings, high-pressure seamless steel pipe, steel weld or weld seam ultrasonic testing method.
1.4 acoustic emission detection
Acoustic emission testing technology is a dynamic nondestructive testing method developed in recent years, used for high pressure seamless gas cylinder hydraulic or pneumatic test monitoring, pressure under the load of active risk found defective. A more reliable guarantee the safe usage of high-pressure seamless gas cylinders.
High-pressure seamless gas cylinder material are high strength low toughness or in low toughness of steel, the fracture toughness value is low. Once a crack tip is yield, produce crack signals (fundamental frequency range of 100-100 KHZ), if loading again, cylinders will generate fracture or failure, a large amount of experimental study on the following conclusions.
1.4.1 equivalent crack size, the greater the wall thickness of surplus value is smaller, the higher the stress and strain values, the acoustic emission signal is more easy to release from there.
1.4.2 acoustic emission testing at low stress levels, namely below the hydraulic or pneumatic test pressure, detection, which endanger the safety of the gas cylinder active defects, especially crack extension period.
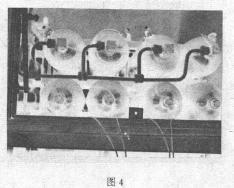
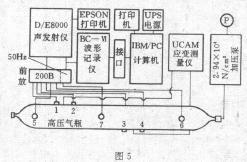
In recent years, I have to steel seamless high pressure gas cylinder material (16 MNR, 20 g, 30 crmnsi, 30 crmo4 and 15 mnmovr, etc.) of the acoustic emission characteristics, waveform and spectrum characteristics of experimental research, and experiment with artificial defects in cylinder pressure system, large amounts of data were obtained. On the basis of formulating the JB/TQ753 in service pressure vessel ae testing methods and JB XXX military high-pressure cylinders acoustic emission detection assessment method (awaiting approval) two standard, preliminary solved the high-pressure seamless gas cylinders of acoustic emission detection problem. Material yield stress is less than 800 mpa steel high-pressure seamless gas cylinders of acoustic emission detection method can, in accordance with the provisions of the JB/TQ753 material yield stress is greater than or equal to 800 mpa or QuJiang ratio greater than or equal to 80% of the steel high-pressure seamless gas cylinders of acoustic emission detection method should be performed according to provisions of a standard after. Since 1987, I had to xichang satellite launch base 228 automotive high-pressure seamless helium and nitrogen gas bottle and two spherical gas cylinders for the popularization and application of acoustic emission detection, as shown in figure 4. Detection scheme mainly USES the acoustic emission testing, the combination of conventional nondestructive testing and safety evaluation method. Namely in the process of gas cylinders in service inspection, to monitor gas cylinders hydraulic or pneumatic test, check out the active dangerous defect area. Then, use the conventional NDT methods of acoustic emission signal location point detection, to determine the location of the defect, size, particularly their height, and according to the code of CVDA - 84 pressure vessel defects assessment evaluation calculation, determine the safe use fixed number of year. In-situ test acoustic emission instrument configuration interface diagram as shown in figure 5. Checked the cylinder after an inspection cycle of field use, work well so far, have gained good reputation among the users. Practice has proved that acoustic emission detection is an effective detection method of high pressure seamless gas cylinder, to ensure the safety of gas cylinders is of great significance. The deficiencies are: for aluminum alloy high-pressure seamless steel gas cylinders, less test data, the work is not thorough, still stay in the laboratory stage, remains to be further.


2 the conclusion
60 s, early 70 s, the failure and a series of high-pressure seamless gas cylinder explosion accident, result in a cylinder of recognition and evaluation of quality assurance system. Through a lot of experimental research and theoretical analysis show that, as a kind of effective means of nondestructive testing (NDT) methods, the cylinder manufacturing and inspection CSL a extremely important role in service. Major industrial developed countries in the world is to accumulate a large amount of data and enough based on practical experience, have been or will soon nondestructive testing in high pressure seamless gas cylinder in the manufacturing and inspection norms and standards in service, as a qualified provisions enforced. Domestic this aspect of the work done is not enough, also with the international advanced level gap is bigger, also should accelerate the research in this area, to ensure the safe use of high-pressure seamless steel gas cylinders, sound and perfect the standard system of gas cylinders, catch up with the world advanced level.
References (abbreviated)
